Tuesday, February 27, 2007
Wow! Domino in action!
Today I cut the mortises for the gussets -- both leg side and top side. I learned a bunch about Domino.
First, cutting mortises after marking them, even on an irregular piece like the gusset for this bench, is a breeze - truly fast and easy. Much like you would cut a biscuit, but with the see through top and hairline centering marks, totally a breeze.
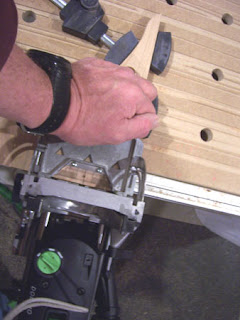
For the gusset, I used different depths for a 8 X 40 tenon -- 15 mm in the top and leg side and 25 in the end grain on the gusset. Incredibly precise , really fast - even though I am way up on the learning curve.
Doing the mortises on the legs started off a little tricky. I thought I would need to test some pieces to make sure the center-line of the joiner matched the center-line of the mortises. Fortunately, while I was setting up for the test, I saw this little mark on the right side of Domino’s base. Hmm, I thought - could that be a centerline mark? Looks pretty close and after I tested it - I found out it was. Setting up for a cut in the middle of a slab is now, mostly, a layout issue. The simple straight edge that I used was quite sufficient for the task. The mortises all lined up perfectly.
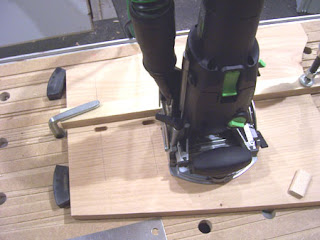
Even being so far up on the learning curve, it took a small fraction of the time to do a conventional mortise.
Layout, because Domino is so precise, must be done carefully and using a sharp pencil. Once the layout is done, the actual cutting of the mortises is almost anti-climactic.
This is truly one of those tools that changes the way you work and think about projects!
First, cutting mortises after marking them, even on an irregular piece like the gusset for this bench, is a breeze - truly fast and easy. Much like you would cut a biscuit, but with the see through top and hairline centering marks, totally a breeze.

For the gusset, I used different depths for a 8 X 40 tenon -- 15 mm in the top and leg side and 25 in the end grain on the gusset. Incredibly precise , really fast - even though I am way up on the learning curve.

Doing the mortises on the legs started off a little tricky. I thought I would need to test some pieces to make sure the center-line of the joiner matched the center-line of the mortises. Fortunately, while I was setting up for the test, I saw this little mark on the right side of Domino’s base. Hmm, I thought - could that be a centerline mark? Looks pretty close and after I tested it - I found out it was. Setting up for a cut in the middle of a slab is now, mostly, a layout issue. The simple straight edge that I used was quite sufficient for the task. The mortises all lined up perfectly.

Even being so far up on the learning curve, it took a small fraction of the time to do a conventional mortise.
Layout, because Domino is so precise, must be done carefully and using a sharp pencil. Once the layout is done, the actual cutting of the mortises is almost anti-climactic.
This is truly one of those tools that changes the way you work and think about projects!
Monday, February 26, 2007
A little bit old, a little bit new...
The bench is moving closer to completion.
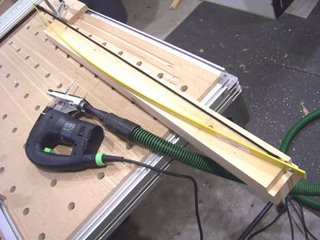
Here you see why I like my FesTool Trion jigsaw so much. I don’t own a band saw, and to date, haven’t felt any need for one with this jig saw around.

Notice the smooth cut - amazingly smooth and consistent. And at the end, there may be a couple of thimble-fulls of saw dust from the underside of the cut that the vac didn’t catch. And my jig saw will cut up to 100 - 125 mm easily and plumb - no bending.
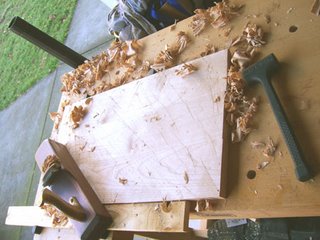
And once in a while I have to go back to my “Neanderthal” days -- when I built furniture without the help of my “tailed apprentices”. There is something very satisfying in planning and surfacing a rough board. The plane is from Steve Knight up in Portland and the winding sticks are from Lee Valley. A great combo for me. I do own a planner - and use it often, but it is a 13” DeWalt and a lot of my pieces are much wider. I do thickness them often to start, but didn’t feel like it this time. It is good to know that the old ways are still in my hands.

I think that is one reason I like my FesTools so much - they quickly become an extension of me, just like my hand tools - only much faster and more efficient.
Tomorrow or the next day - Domino will be featured joining all the pieces into a bench.
Here you see why I like my FesTool Trion jigsaw so much. I don’t own a band saw, and to date, haven’t felt any need for one with this jig saw around.

Notice the smooth cut - amazingly smooth and consistent. And at the end, there may be a couple of thimble-fulls of saw dust from the underside of the cut that the vac didn’t catch. And my jig saw will cut up to 100 - 125 mm easily and plumb - no bending.
And once in a while I have to go back to my “Neanderthal” days -- when I built furniture without the help of my “tailed apprentices”. There is something very satisfying in planning and surfacing a rough board. The plane is from Steve Knight up in Portland and the winding sticks are from Lee Valley. A great combo for me. I do own a planner - and use it often, but it is a 13” DeWalt and a lot of my pieces are much wider. I do thickness them often to start, but didn’t feel like it this time. It is good to know that the old ways are still in my hands.

I think that is one reason I like my FesTools so much - they quickly become an extension of me, just like my hand tools - only much faster and more efficient.
Tomorrow or the next day - Domino will be featured joining all the pieces into a bench.
Friday, February 23, 2007
Sooo good!
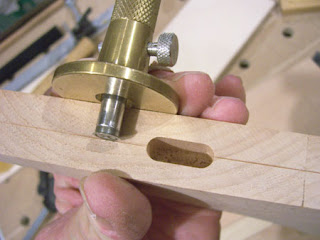
Well, I tried it on one of my most typical applications - a 2” face frame joint - simple, but time consuming when you do 40 or 50 at a time. Even the first one I tried was perfect - it was easy to set up and oh so fast!
The first thing I noticed is that operation of the Domino is the controls and adjustments are on Domino are intuitive and very precise. Granted, I’ve likely watched the demo movie on their web site, ohh, about 100 times, but it is still incredibly intuitive and easy to use, with little learning curve to get the basic joints down quickly.
I didn’t even bother putting the Stops on - I simply marked the center of both pieces with my highly accurate #2 pencil, clamped them to my MFT and zipped in a couple of very precise tenons using the see-through plate with hair-line centering and voila` - inserted the tenons - a clean, precise face frame joint is way less time than it takes to tell about it. One of the beauties of this system is the height adjuster - totally repeatable and precise. Both pieces aligned perfectly -- ready to glue.
This first image shows the tenon inserted fully into one side, ready to fit up so you can see the tenon.

This image shows the final joint - a perfect, squared up, super-fast floating tenon joint! The pencil scribe marks are clearly visible in this image. Note the precise alignment.

I’ll be working on more test pieces this weekend and will post them as I do them.
Yeehhhaww!!
Yeeehhhaaw!!
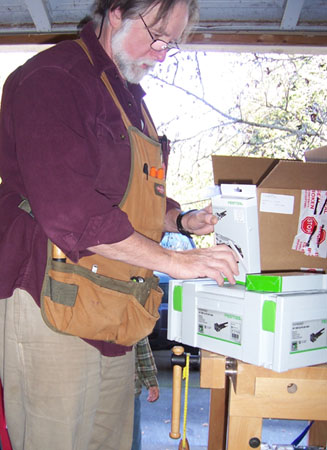
It’s here!!! My Domino arrived today!!!
Here are some pix of how it looks on arrival. I think I was expecting 2 boxes: one each for the Domino tenons in their Systainer and the Domino Joiner, but as the UPS man delivered one, large, but not huge box. I was pleasantly surprised at how compact the whole system really is.

I got the Domino Joiner, Domino Tenon assortment, and both the Cross Stop and Trim Stop. A nicely complete package!
My oldest son, 7, helped my by taking some pix as I was unwrapping it.


Here is a picture of both Systainers open showing their contents - the Cross and Trim stops are propped up on the tenon back:

As usual with FesTool, everything has a place. It is one of the great things about the system - it is a system and it all works together, and everything fits into the system.
I’m going to do a small test project and will post the results later this evening. I can't wait to actually use this machine after dreaming about it for months!
It’s here!!! My Domino arrived today!!!
Here are some pix of how it looks on arrival. I think I was expecting 2 boxes: one each for the Domino tenons in their Systainer and the Domino Joiner, but as the UPS man delivered one, large, but not huge box. I was pleasantly surprised at how compact the whole system really is.

I got the Domino Joiner, Domino Tenon assortment, and both the Cross Stop and Trim Stop. A nicely complete package!
My oldest son, 7, helped my by taking some pix as I was unwrapping it.

Here is a picture of both Systainers open showing their contents - the Cross and Trim stops are propped up on the tenon back:

As usual with FesTool, everything has a place. It is one of the great things about the system - it is a system and it all works together, and everything fits into the system.
I’m going to do a small test project and will post the results later this evening. I can't wait to actually use this machine after dreaming about it for months!
Project progress
I cut the sample leg for the night stands. It took the glue almost two days to dry enough for working. I was likely being a bit conservative in waiting, but I’m running out of scrap pine.
It looks nice - I’ll have finish pix tomorrow when I deliver it.
Here is one of the legs for the bench being surface planned -- the old way. Working with a hand plane has its own sense of satisfaction. This will smooth out nicely, just like the other pieces of the bench.
It looks nice - I’ll have finish pix tomorrow when I deliver it.

Here is one of the legs for the bench being surface planned -- the old way. Working with a hand plane has its own sense of satisfaction. This will smooth out nicely, just like the other pieces of the bench.

Wednesday, February 21, 2007
Still waiting
I was hoping to have some pix tonight, but I'm still waiting for the glue to dry - it has been raining cold here and that means my glue-ups take longer to set up.
More tomorrow for sure! Maybe my Domino will arrive - I'm trying not to get my hopes up, but it could be here...
More tomorrow for sure! Maybe my Domino will arrive - I'm trying not to get my hopes up, but it could be here...
DOMINO... and another leg and a new bench - all in one week
I got some very good news last week. I’m going to get one of the new FesTool Domino joining systems!! I’ll be doing the tables and bed and, well, everything with the new Domino. I’m so excited I can hardly sleep - it will be here maybe Thursday, but likely Friday.
If you aren’t familiar with Domino, go to http://www.festoolusa.com/pages.aspx?docid=534 - be sure to check out the videos, they’re great! I think this machine is going to significantly change the way quality woodworking is done today - it is that good.
I’m making another sample leg for my client to look over - she wants some changes from the first one. Even chunkier than the first one. Here is a picture of the new leg in the making. Once again, I’ll use my FesTool Trion jigsaw to cut the curves. I’ll have some pix later today if all goes as I plan.

I’m also working on an old style hall bench. Here I am ripping the seat to size.

I am making it out of Alder and will distress it some during finishing for an antique look to go with the dictionary stand I made a few months ago - which is in a winery gallery in Healdsburg and definitely in need of some companionship. If you are in the neighborhood and want to see them - they are at the Christie Vineyards Tasting Room off Hudson Street. The bench should be there by early next week - and the stand is there now. I'll be making a table to go with them next.
Of course I’m going to use Domino on the new bench - well virtually everything will built with Domino from now on I think!! A great trial run for a great machine.
Friday, February 16, 2007
Prototype
Here is a pine prototype of the the table leg. On this table and bedroom set, the small end is the top - check out the earlier drawings and you can see how they look - chunky cool.

I made this, as I'll make the actual legs, using my FesTool Trion jig saw with a 105 mm blade to cut through the 3" thick pieces, and my Rotex 125 sander to finish it up. The jig saw leaves a pretty clean cut and finishing is fast and easy.
I’ll use this as the model and template for the actual legs as well. I need to go drop it off for my client to see. My wife thinks it is “cute”.
Thursday, February 08, 2007
A new project!
I'm starting on a new project - and bedroom suite for some nice folks down in Healdsburg.
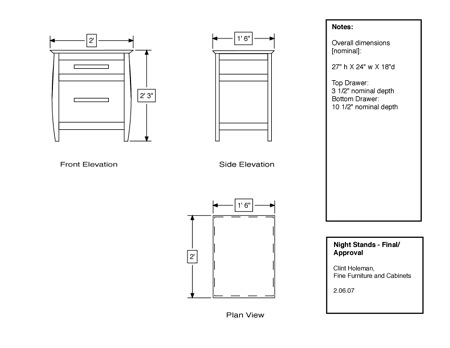
Here is a sketch of the night stands.

As usual, I'll be using only Festools - that's what I use to build all of the furniture and cabinets I build. I'm going to try, this year, to show more of how I use the Festools to build the projects.
The first step with this project will be to build the legs and the first step there will be to make a mock-up for the client to approve. I'll be doing that in the next few days. The legs are important from a design and esthetics viewpoint - and most importantly, the client's viewpoint.
It is a fun project and should be challenging to get the curves just so!
Here is a sketch of the night stands.
As usual, I'll be using only Festools - that's what I use to build all of the furniture and cabinets I build. I'm going to try, this year, to show more of how I use the Festools to build the projects.
The first step with this project will be to build the legs and the first step there will be to make a mock-up for the client to approve. I'll be doing that in the next few days. The legs are important from a design and esthetics viewpoint - and most importantly, the client's viewpoint.
It is a fun project and should be challenging to get the curves just so!
Wednesday, February 07, 2007
I'm back...
I'm off hiatus now and will be posting more project stuff within the next day or so.
Ciao!
Clint
Ciao!
Clint
![]()
Subscribe to Posts [Atom]